Winter in Long Island has a way of exposing every weakness in your home, and nothing announces a failure quite like a garage door that refuses to open on a 20-degree morning. You’re already late, coffee in hand, and the door just sits there. It’s a specific kind of frustration that we’ve seen play out more times than we can count.
The truth is, most garage door problems that show up in January didn’t start in January. They started in October, or September, when a little bit of routine attention would have stopped the whole thing from snowballing. We’ve been in enough crawl spaces and on enough ladders in freezing rain to know that prevention isn’t glamorous, but it beats a $300 emergency service call on a holiday weekend.
So here’s what we actually recommend for Long Island homeowners who want their doors working through February. Not the generic list you find on a national blog. The stuff that matters here, in our climate, with our salt air and our older housing stock.
Key Takeaways
- Long Island’s freeze-thaw cycles and coastal humidity cause specific wear on garage door components that inland guides don’t address.
- Lubricating the wrong parts or using the wrong lubricant can actually attract more grit and cause premature failure.
- Weatherstripping is the single most overlooked item in winter prep, and replacing it is a 20-minute job.
- Springs and cables should never be DIY-adjusted; knowing when to call a pro like Alo Garage Doors located in Long Island can save you a hospital visit.
The Real Enemy Isn’t Cold, It’s Moisture
We hear people talk about “winterizing” their garage door like it’s about insulation. And sure, insulation matters if you have a conditioned space above the garage. But the real mechanical enemy on Long Island is moisture that freezes and expands inside gaps you didn’t know existed.
Our coastal air carries a lot of salt. That salt settles into hinge pins, roller bearings, and spring coils. When the temperature drops, that salty moisture turns into a thin layer of ice that acts like sandpaper every time the door moves. We’ve pulled apart rollers that looked fine on the outside but had rusted solid inside the bearing race.
The fix isn’t complicated, but it’s specific. You need a silicone-based or lithium-based lubricant, not WD-40. WD-40 is a solvent, not a lubricant. It will wash away the existing grease and leave the metal dry. We’ve seen homeowners spray an entire door down with WD-40 thinking they were helping, only to have everything seize up within two months.
Where to Lubricate and Where to Leave Alone
Focus on the moving contact points. The hinge pins where the door sections fold. The roller stems where they enter the track. The bearing on the spring torsion tube. The lock latch mechanism if you have one.
Do not lubricate the track itself. The track is meant to have friction so the rollers grip and guide properly. Greasing the track just creates a mess and can cause the door to bind or slip. We’ve seen doors derail because someone thought slippery tracks were a good idea.
One pass per component, wipe off excess, and cycle the door a few times to work it in. That’s it. Do this once before the first hard freeze and once in mid-February, and you’ve already prevented 70% of the winter issues we see.
Weatherstripping Is Your First Line of Defense
If you stand inside your garage on a windy day and feel a draft along the bottom of the door, you have a weatherstripping problem. That gap is letting in cold air, yes. But it’s also letting in moisture, leaves, and salt spray. Over a single winter, that constant moisture wicking up into the bottom panel can rot the wood or rust the steel from the inside out.
We’ve replaced entire bottom sections of doors that looked fine from the outside but had delaminated because the rubber seal was cracked for three years. The seal costs about $20 and takes twenty minutes to replace. The bottom panel costs a few hundred and requires a service call.
Check the seal along the sides and top of the door too. The rubber or vinyl trim can shrink and pull away from the frame over time. If you see daylight, it’s time to replace it. Most home centers carry universal seal kits, but the fit matters. An uneven seal can cause the door to bind when it contracts in the cold.
How to Replace a Bottom Seal
Slide the old seal out of the retainer channel. Clean the channel with a putty knife to remove any grit or old rubber bits. Apply a thin bead of silicone lubricant to the channel to help the new seal slide in. Push the new seal through from one end, making sure it’s oriented correctly (the hollow bulb faces outward). Trim the excess with a utility knife.
That’s it. If your retainer is damaged or rusted, you might need to replace that too, but that’s a more involved job. Most of the time, the old retainer is fine.
The Tracks Are More Sensitive Than You Think
We see a lot of homeowners try to adjust their track alignment with a hammer. That usually makes things worse. The tracks on a garage door are precision-aligned at the factory or during installation. If they shift, it’s usually because the mounting brackets loosened over time, or because the concrete floor settled.
Before winter, check that all the track mounting brackets are tight. Use a socket wrench, not a screwdriver. If a bracket is loose, the track can move when the door is in motion, causing the rollers to jump out. A derailment in the middle of winter is a bad day.
If the track is visibly bent or dented, don’t try to straighten it yourself. The metal work-hardens and can crack. A professional can replace a track section in about an hour. Trying to hammer it straight usually leads to a call to garage door repair services anyway, but after you’ve already made it worse.
Springs Are Not a DIY Item
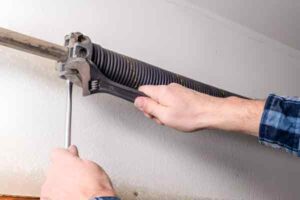
We have to say this every year. Torsion springs are under extreme tension. When they break, they release that energy violently. We’ve seen garage doors punch holes in ceilings and cables whip across entire garages. There is no safe way for a homeowner to replace or adjust a torsion spring without the proper tools and training.
If your door feels heavier than usual, or if it slams down when you try to close it, that’s a spring issue. Don’t keep using it. Call a professional. Alo Garage Doors located in Long Island handles spring replacements daily, and it’s one of the few jobs where we actively discourage any DIY attempt.
Extension springs (the ones that run along the horizontal tracks) are slightly less dangerous but still not a beginner project. They can snap and fly across the room. Leave them alone.
Signs Your Springs Are Failing
The door opens unevenly or jerks during travel. You hear a loud bang from the garage (that’s a spring breaking). The door won’t stay open on its own. The door is harder to lift manually than it used to be.
Any of these symptoms mean you need a professional inspection. Don’t wait. A broken spring puts all the stress on the opener, which can burn out the motor or damage the gear train.
The Opener Needs Attention Too
The garage door opener is a motor and a gearbox. It needs maintenance just like any other mechanical system. The chain or belt drive should be checked for tension. A chain that’s too loose can slap against the rail and wear out the sprockets. A chain that’s too tight puts extra load on the motor.
Most openers have an adjustment screw or nut on the motor unit. The manual will tell you the correct sag measurement. If you’ve lost the manual, look up the model number online. It’s usually a quarter-inch of deflection in the middle of the chain.
Also check the safety sensors. Those little eyes near the floor. They can get knocked out of alignment by a broom handle or a box. If one is misaligned, the door won’t close. Clean the lenses with a dry cloth. If the LED on the sensor isn’t lit, the wiring might be damaged. That’s another job for a pro.
Battery Backup and Power Outages
Long Island gets nor’easters. Power goes out. If your opener has a battery backup, test it before winter. Press the wall button while the unit is unplugged. If the door doesn’t move, the battery is dead. Replace it. Most backup batteries last two to three years.
If you don’t have a backup, make sure you know how to disengage the opener manually. There’s a red pull cord hanging from the trolley. Pull it down and back to release the door. Then you can lift it by hand. Practice this once so you’re not fumbling in the dark during a storm.
When Professional Help Actually Saves You Money
There’s a common misconception that calling a professional is always more expensive. That’s not true when you factor in your time, the risk of injury, and the cost of buying tools you’ll use once.
For example, replacing a set of torsion springs costs around $200 to $350 depending on the door size. The springs themselves cost about $40. The winding bars cost another $30. The risk of losing a finger? Priceless. The math works out in favor of the professional every time.
Similarly, if your door is off-track or the cables have come loose, don’t try to force it back. Cables under tension can snap and cause serious injury. We’ve seen people try to “pop” a cable back onto a drum with a screwdriver. It doesn’t end well.
| Task | DIY Feasibility | Typical Pro Cost | Risk Level |
|---|---|---|---|
| Lubricating hinges and rollers | Easy, 15 minutes | $50–$80 (if bundled) | Low |
| Replacing bottom weather seal | Moderate, 30 minutes | $75–$120 | Low |
| Tightening track brackets | Easy, 10 minutes | $50–$75 | Low |
| Replacing torsion springs | Not recommended | $200–$350 | Very high |
| Replacing cables | Not recommended | $150–$250 | High |
| Replacing opener logic board | Moderate with guidance | $180–$300 | Moderate |
| Full door replacement | Not recommended | $800–$1,500+ | High |
What About Insulation and Energy Loss
Long Island winters aren’t as brutal as Buffalo’s, but they’re cold enough that an uninsulated garage door can drop the temperature in an attached garage by 10 to 15 degrees. That affects the room above it and can increase your heating bill.
If your door is steel and doesn’t have insulation, you can buy foam panels that cut to size and slide into the door sections. It’s a messy job but straightforward. Wear gloves and a mask because the fiberglass can irritate your skin.
If your door is wood, insulation is trickier. You can add rigid foam to the inside face, but it changes the weight of the door and may require spring adjustment. Better to consult a pro before adding significant weight.
A Note on Long Island’s Older Homes
A lot of homes in Nassau and Suffolk counties were built in the 1950s and 60s. That means the garage door opening might not be standard size. It also means the framing around the opening might have settled or shifted over decades.
If your door is original to the house, the wood might be rotting at the bottom. The hardware might be rusted. The springs might be the original set. In those cases, a full replacement is often more cost-effective than trying to patch together a 60-year-old system.
We’ve worked on homes near Jones Beach where the salt air had corroded every metal component on a door that was only 10 years old. The homeowner had been lubricating it regularly, but the damage was already done. Sometimes maintenance can only slow the decay, not stop it.
Final Thoughts
Winter on Long Island is going to do what it does. The freeze-thaw cycles, the nor’easters, the salt air. Your garage door is going to take a beating. But most of the problems we see are preventable with a little attention in the fall and a quick check in January.
Lubricate the right parts. Replace the weather seal. Check the track brackets. Leave the springs alone. Test the opener. And if something feels wrong, trust that feeling. A professional inspection costs less than an emergency repair on a holiday weekend.
We’ve been doing this long enough to know that the best service call is the one that never happens. But when it does, we’re here.